In the early stages of a wrist injury, (whether it be a sprain, strain, tendonitis, TFCC injury, or after a cast is removed) therapeutic exercise is essential for a quick and complete recovery. Targeted exercise can help to maintain/gain range of motion, improve swelling, decrease pain, and improve neuromuscular control (aka the nerve-muscle connection).
If the injury is still in the inflammatory stage (early on, still swollen) be sure to keep these exercises in a pain-free range. (Yup – I bolded this. It’s a big deal). If you push too hard to fast you run the risk or re-injury and can lose function and extend the return to sport.
If this is a more chronic (old, nagging) pain or you just came out of a cast, feel free to be a little more aggressive. In this case getting the range of motion back may involve pushing past some mild discomfort (yep – discomfort, not pain). The goals are a little different as you’re not trying to help with swelling or maintain range, rather you’re starting from a limitation and building back.
The Exercises:
- Wrist circles: With the hand in a relaxed fist, gently roll through the entire range of motion in a clockwise and counter clockwise direction. The goal is to gain range of motion in all planes without irritation. Perform 10-20 repetitions in each direction.
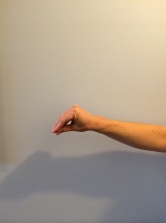
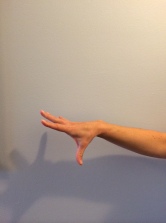
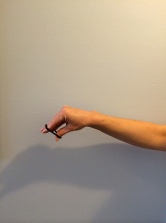
- Wrist AROM: flexion, extension, ulnar deviation, radial deviation, supination (turning the palm and forearm up), and pronation (turning the palm and forearm down): Gently move through each direction of motion (if you’re unsure of the term, check out the blog post on the “Anatomy of the Wrist.” The key with this exercise is to keep the hand open and relaxed while moving as far in each direction as you can. Do 10-15 reps each direction.
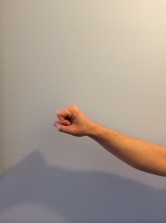
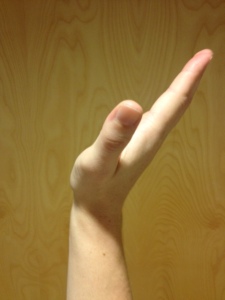
Ulnar Deviation (left hand)
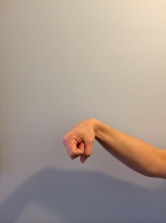
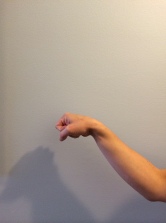
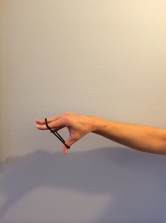
Radial Deviation (left hand)
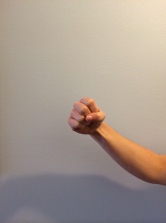
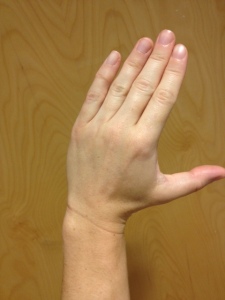
Wrist extension (right hand)

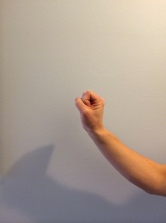
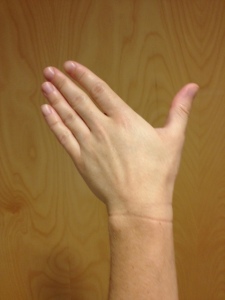
Wrist flexion (right hand)
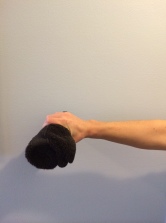
- Towel (or putty squeeze): Grip a small towel (rolled up) or some rehab putty (play doh works too); squeeze and relax the hand in a motion that allows you to mash and form the putty. The goal is not to make a distinct shape (sorry artsy folks) but to engage the flexors of the fingers and hand while encouraging the stabilizers of the wrist to work synergistically (together in a beneficial way) to keep the wrist fixed and stable. Try to perform this for 1-3 minutes at a time with a rest break in between.
- Finger extensions (with and without a rubber band): Simply stated, this involves opening and closing the fingers. The goal is to keep them extended (straight) and to challenge the finger and wrist extensors. Try and keep the wrist neutral throughout. Do 10-15 reps, 1-2 times. To increase the difficulty add a rubber band; to increase it further, add two.
- Wrist stretches (with over pressure): flexion and extension;
Flexion: With the fingers extended, pull the wrist and hand down (into flexion) until a stretch is felt on the top of the forearm and or wrist (in the extensor muscles). Hold this for 30-45 seconds. Be sure to avoid pain. To increase the intensity, bend the fingers into a relaxed fist.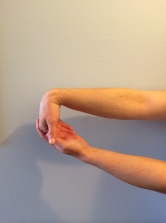 Extension: With the fingers relaxed, grab the palm and pull the wrist and hand up (into extension) until a stretch is felt in the bottom of the forearm/wrist (in the flexor muscles). Hold this for 30-45 seconds. Be sure to avoid pain. To increase the intensity, grab the fingers and pull (they will now be in an extended position thus putting more of a stretch on the flexor muscles).
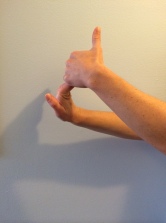


Progression:
Once these exercises are easy (and pain-free) and your range of motion and flexibility on the affected wrist is equivalent to the other side, it is time to move to some strengthening exercises. Check out “Intermediate Exercises for the Wrist.” – Coming soon!


